now you know what the tools are, you’ve flipped through the plugins, you’ve looked at the settings, you know what markdown is
great, let’s actually get some useful work done.
this is my vault’s setup, it might not work for you, if it doesn’t then it isn’t even skill issue, go do the thing that actually works for you, tell me about it part two of the obsidian post from before (here)
Skeleton
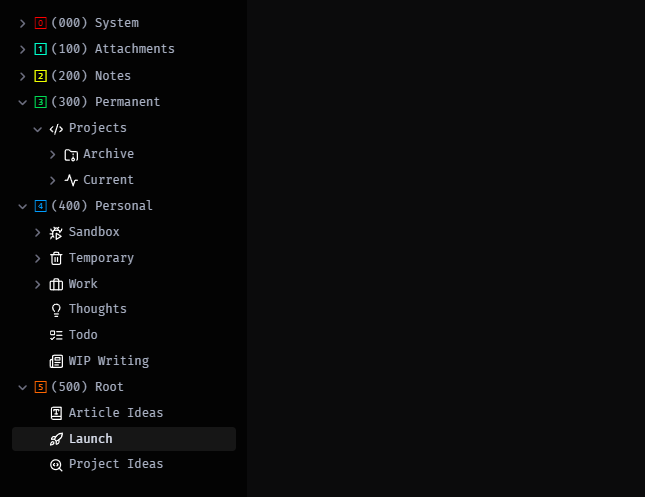
start with the following:
-/
├── (000) System
├── (100) Attachments
├── (200) Notes
├── (300) Permanent
├── (400) Personal/
│   ├── Sandbox/
│   │   └── Test.md
│   ├── Temporary/
│   │   └── Quick Dump.md
│   ├── Todo.md
│   └── Thoughts.md
└── (500) Root/
    └── Launch.md
my setup for directories is broken down like this:
- (000): used for obsidian plugins/themes, don’t touch in day-to-day
- (100): files and embed junk
- (200): notes are auto-created in here
- (300): once something is high quality i move it here
- (400): this is not included in any of the maps and can’t be referenced, but can reference out (good for work todo lists etc. that require further reading)
- (500): this is where we live most of the time
not sure where the number format thing for these files came from, but they are handy for keeping them in that order on the system and in the sidebar
the only three files not covered somehow below are Sandbox / Test - Todo - and Thoughts, Test is for playing with new plugins, the whole Sandbox space is, try not to test in production. Todo is for a task list, simple accountability without paying $10 a month for an app, and Thoughts is for those random ideas you have while doing chores.
everything has a place.
Settings
folders (000) and (400) are set to being excluded, which means:
- files in this folder cannot be linked to
- files in this folder do not show up in the graph
- files in this folder can still link to other pages
folder (100) is set to being the place where attachments are stored
folder (200) is set to being the default note location
Process
in this section i’ll give examples of how to leverage the power of this system to practically take notes in various different scenarios
Deep Research
if the topic you are researching is wide/deep and contains many sub-topics then this approach has been useful for me
- make a link in Launch (i.e. [[Second Brain]] )
- click that link, this will create Second Brain under (200)
- use Grok or another model to generate your summary:
in a short and concise way (eli5), explain the following topic
include zettelkasten style [[wikilinks]] to key concepts
if they are general terms that would require disambiguation then add the topic into brackets in the link, while also setting the visual of the link to be just the key term
i.e. "Paragraph" as a key term in the subject "COBOL" could be written as [[Notes (COBOL)|Notes]]
make sure to only include keywords that would be useful to research further

Topic:

<put topic here>
- make sure to read and mentally “check-in” the summary, this is important but underrated, we’re trying to learn here
- paste these notes into your new page

- repeat while going deeper into your notes, until you hit a point of “understanding”
- at this point you can start to flesh out your “known” topics, using resources that helped you to understand, document everything if not just because you can, even if it sucks, make a note of the resource and write down that it sucks
On-the-fly Research
if the topic you want to understand is happening in the moment (say you are in a beginner class / youtube / etc. trying to understand some specific syntax in a programming language) then this method works well
- go to your Quick Dump
- while you are learning the subject just make the skeleton of the ideas/keywords/concepts - we aren’t looking to be verbose, it should take a couple seconds max to put an idea down

- continue until your session is finished
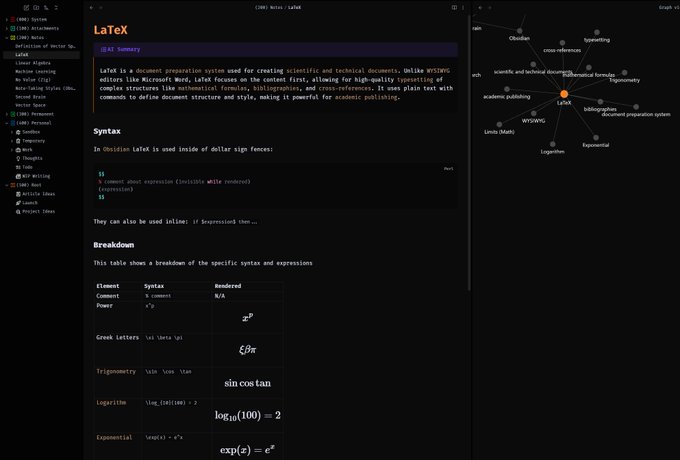
- later when you are greenkeeping grab the notes you made in Quick Dump and copy them into a dedicated note, in this case (200) Notes / Latex
- expand on your notes
- this process will help reinforce what you have learned, and also force you to venture outside of the limited scope of your initial study session
- add any details you can, grab images to help, siphon from any kind of website (be sure to keep a reference for later), create diagrams, create tables, draw things out, throw in examples
- optionally after this stage you can consider moving the note into (300) Permanent - but only if you feel it is reasonably complete (held to your own personal standard, that is)
General Tips
- your notes should take very little time to create - if you take a long time to take notes then you need to refine your workflow, this should be fast
- there is probably a plugin for whatever you are doing - if you are doing math then there are many latex plugins, code has plugins, dungeons and dragons has a plugin.
- ideally your polished notes should look like an infographic - this is a point of personal preference, your notes should still not take a lot of time to create, but you should feel like you would be proud to show your notes to a friend, make them good, make them look good, make them feel good.
- everything is a learning opportunity - if you join a space on X and hear people talking about some wild concept then note down the keywords, ask Grok later, write the core points down and when you come to refine you will have everything you need to skill up
that’s just about all for now, i’m sure there will be more later on down the line because despite all of this practical advice there is still a feeling that the surface has only just been scratched
go learn, take notes, do stuff
〆 alia